
What should I know about MySQL HeatWave?
HeatWave is a massively parallel, high performance, in-memory query accelerator that accelerates MySQL performance by orders of magnitude for analytics workloads, mixed workloads, and machine learning.
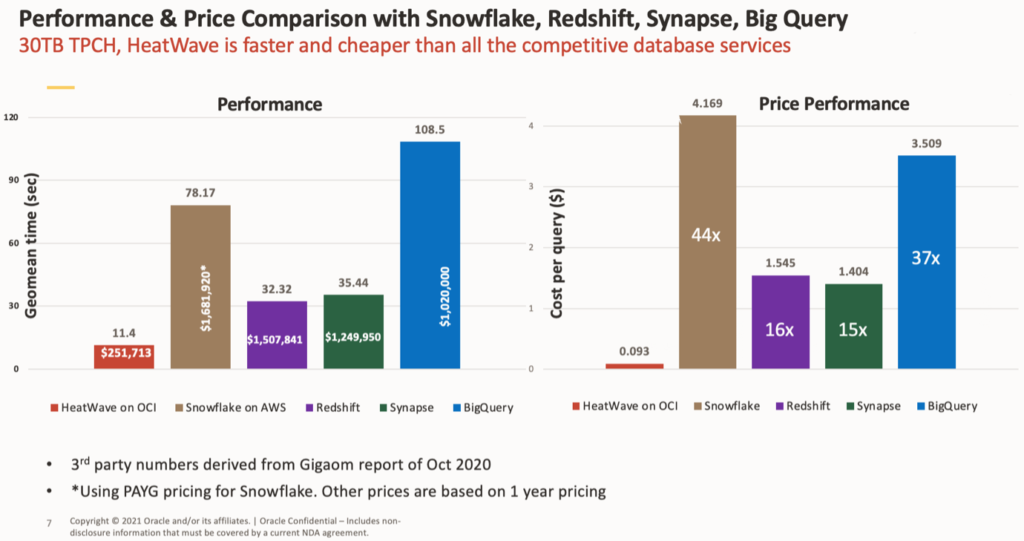
It is a distributed, scalable, shared-nothing, in-memory, columnar, query processing engine designed for fast execution of analytic queries. According to the official documentation, it accelerates MySQL performance by 400X for analytics queries, scales out to thousands of cores, and is 2.7X faster at around one-third the cost of the direct competitors.
When you enable a HeatWave Cluster, analytics queries that meet certain prerequisites are automatically offloaded from the MySQL DB System to the HeatWave Cluster for accelerated processing, enabling you to run online transaction processing (OLTP), online analytical processing (OLAP), and mixed workloads from the same MySQL database without requiring extract, transfer, and load (ETL), and without modifying your applications.
MySQL HeatWave vs. Rivals Cloud DB ML solutions
Exploring Oracle data, in direct comparison to rival cloud DB services, we can see that HeatWave ML demonstrates clear competitive differentiation against Amazon Redshift ML, Snowflake ML, Synapse ML, BigQuery ML across multiple key features. Note that these features include AutoML, model and prediction explanations, user-facing API, user control of ML functionality, data/model locality, data available, supported number of nodes for training.
How Does MySQL HeatWave Work?
A HeatWave cluster includes a MySQL DB System node and two or more HeatWave nodes. The MySQL DB System node has a HeatWave plugin that is responsible for cluster management, loading data into the HeatWave cluster, query scheduling, and returning query results to the MySQL DB System. HeatWave nodes store data in memory and process analytics queries. Each HeatWave node contains an instance of HeatWave.
The number of HeatWave nodes required depends on the size of your data and the amount of compression that is achieved when loading the data into the HeatWave cluster.
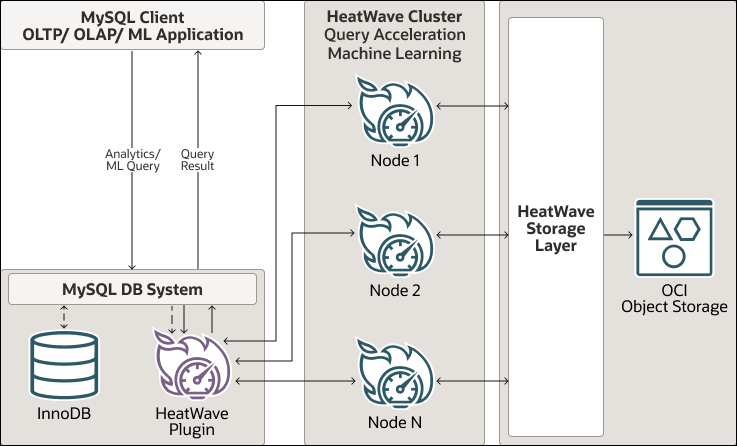
As you can see, users don’t access the HeatWave cluster directly. Queries that meet certain prerequisites are automatically offloaded from the MySQL DB System to the HeatWave cluster for accelerated processing, and the results are returned to the MySQL DB System node and then to the MySQL client or application that issued the query.
How to use MySQL HeatWave in Quadbase products?
To enable this feature, you will need to access the Oracle Cloud Management Site, access the existing MySQL DB System (or create a new one), and add an Analytics Cluster. There you can specify the type of cluster and the number of nodes. You can use the Estimate Node Count feature to know the necessary number based on your workload.
Loading data into a HeatWave cluster requires preparing tables on the MySQL DB System and executing table load operations.
To demonstrate the connection with Quadbase products, we will assume that you have:
- MySQL Oracle Heatwave running in your ORACLE cloud service.
- You want to connect to it from a remote machine in ERES.
To do this, you have to create either a VPN or a Linux server with SSH access in your ORACLE Cloud to be able to connect to the database via an encrypted tunnel.
In this guide, we’ll choose the SSH option. Create a Linux instance in your ORACLE cloud. Save and backup your SSH key during the instance creation process, since you’ll need it for connecting to your database.
Also, make sure that both the database and the Linux instance are running on the same virtual network subnet on ORACLE cloud (so that the Linux instance can communicate with the database).
Keep the instance running, note down the “Public IP address” and use “Username”, save the SSH key.
Steps to success
In this tutorial you’ll learn how to:
- Create VCN and subnets
- Create Linux instances
- Create and populate MySQL Database Service instance
Prerequisites
- You need an Oracle Cloud Infrastructure account.
- A web browser
- SSH Terminal – Cloud Shell (provided in the OCI console). Alternatively, terminal with SSH (Linux or MAC), Windows machine with GitBash/Putty or WSL (Windows Subsystem for Linux).
Create your Virtual Cloud Network and Related Components
Create your VCN and subnets
Set up a Virtual Cloud Network (VCN) to connect your Linux instance to the internet. You will configure all the components needed to create your virtual network.
- Open the navigation menu. Under Core Infrastructure, go to Networking and click Virtual Cloud Networks.
Ensure that a compartment (or the compartment designated for you) is selected in the Compartment list on the left. - Click Start VCN Wizard.
- Select VCN with Internet Connectivity, and then click Start VCN Wizard.
- Enter the following (descriptions are italicized, replace with the values for your scenario):
- Name: Enter a name for your cloud network
- COMPARTMENT: select the desired compartment
- VCN CIDR BLOCK: 10.0.0.0/16
- PUBLIC SUBNET CIDR BLOCK: 10.0.0.0/24
- PRIVATE SUBNET CIDR BLOCK: 10.0.1.0/24
- DNS RESOLUTION: checked
Note The public and private subnets have different CIDR blocks.
- Click Next.
Then create a VCN with Internet Connection configuration dialog will be displayed, confirming all the values you just entered and listing additional components that will be created. - Click Create to start the workflow.
- After the workflow completes, click on View Virtual Cloud Networks and you will be directed to the details page of the VCN you created.
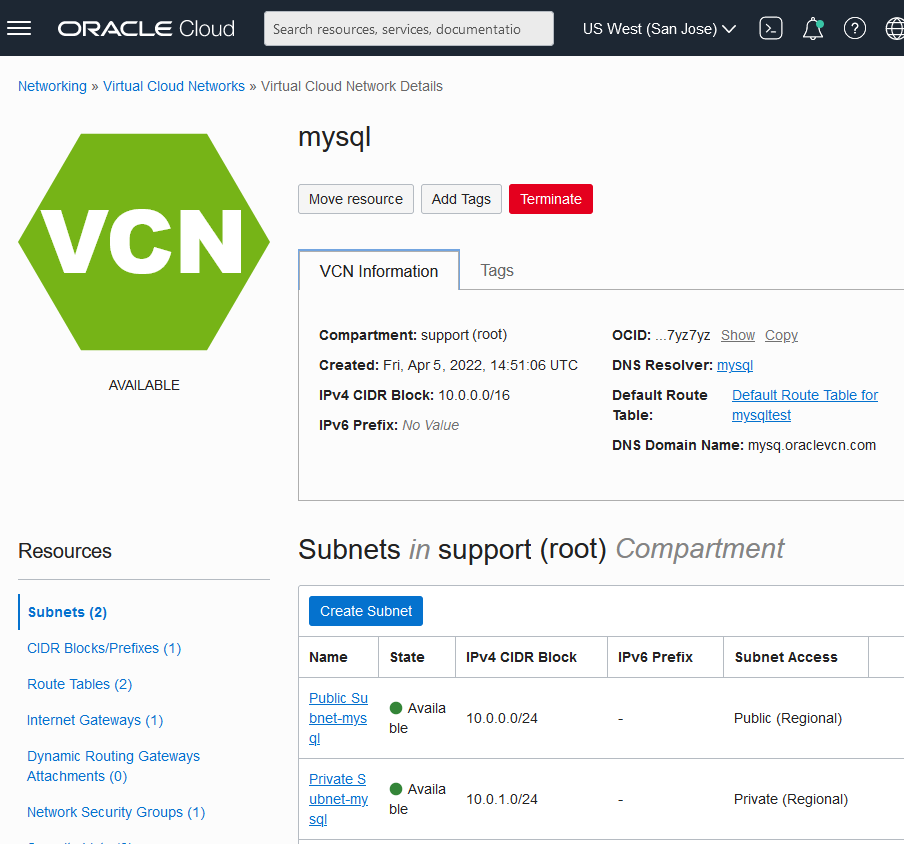
Following screenshot shows a sample Virtual Cloud Network Details settings:
Configure security list to allow MySQL incoming connections
Create a rule in the Security List for Private Subnet-VCN Name security list that will allow incoming connections on ports 3306/TCP and 33060/TCP.
- Click View Virtual Cloud Network to view your new VCN.
- With your new VCN displayed, click on your Private subnet link.
The private subnet information is displayed with the Security Lists at the bottom of the page. There should be a link to the Security List for Private Subnet-VCN Name for your private subnet. - Click the Security List for Private Subnet-VCN Name link.
The default Ingress Rules for your VCN are displayed. - Click Add Ingress Rules.
An Add Ingress Rules dialog is displayed. - Enter the following:
- Stateless: Do not select
- Source Type: CIDR
- Source CIDR: 10.0.0.0/24
- IP Protocol: TCP
- Source port range: (leave-blank)
- Destination Port Range: 3306
- Description: Allow MySQL connections
- Once you click Add Ingress Rule, inbound MySQL connections from the public subnet are allowed.
- Repeat the steps from 1-4 and enter the following:
- Stateless: Do not select
- Source Type: CIDR
- Source CIDR: 10.0.0.0/24
- IP Protocol: TCP
- Source port range: (leave-blank)
- Destination Port Range: 33060
- Description: Allow MySQL X connections
- Once you click Add Ingress Rule, inbound MySQL X connections from the public subnet are allowed.
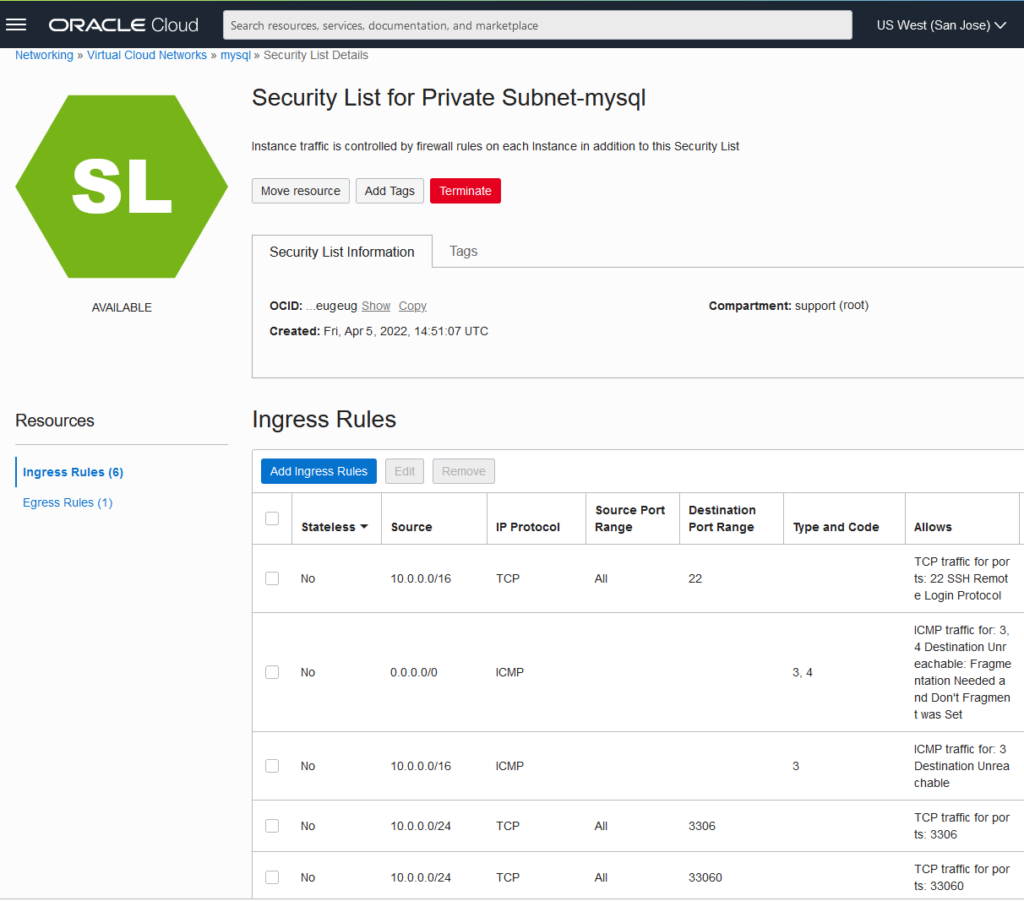
Following screenshot shows a sample Security List Details settings:
Create and Configure Oracle MySQL Database Service
Create Oracle MySQL Database Service required policy
Note: If you are using a free Oracle-provided hands-on lab, creating this policy is not required. You can go to Create your Oracle MySQL Database Service section.
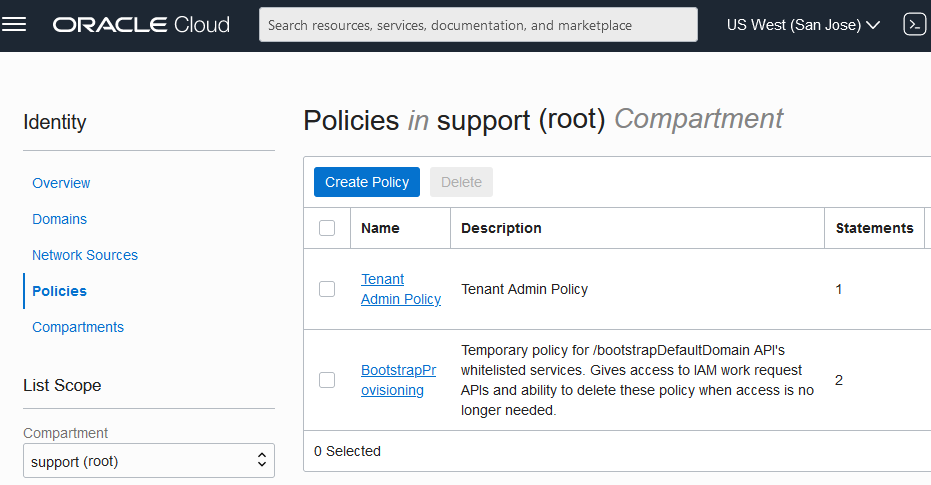
- Open the navigation menu. Under Governance and Administration, go to Identity and click Policies.
- On the Policies page, under List Scope, select the Compartment(root) and click on the Create Policy button.
- Enter the following information:
- Name: policy name
- Compartment: (root)
- In the Policy Builder, click Customize (Advanced).
- Enter the following required MySQL Database Service policies:
Policy Statements- Allow group Administrators to {COMPARTMENT_INSPECT} in tenancy
- Allow group Administrators to {VCN_READ, SUBNET_READ, SUBNET_ATTACH, SUBNET_DETACH} in tenancy
- Allow group Administrators to manage mysql-family in tenancy
- Click Create.
Following screenshot shows a sample Oracle Cloud Policies settings:
Create your Oracle MySQL Database Service
- Open the navigation menu. Under Database, go to MySQL and click DB Systems.
- On the DB Systems page, select the compartment and click on Create MySQL DB System.
- Enter the following information:
- Name: DB system name
- Description: MySQL system Description
- Compartment: select the compartment
- Select an Availability Domain: select the availability domain
- Fault Domain: Optional. Can be left unchecked
- Select a Shape: choose the desired shape by clicking on Change Shape
- Data Storage Size (GB): Enter the desired storage size
- Maintenance Window Start Time: None
- Click Next to advance to Database Information screen.
- Enter the following information:
- Username: administrator user name
- Password: admin password
- Confirm Password:admin password
- Virtual Cloud Network in: select the VCN compartment
- Virtual Cloud Network: select the private VCN
- Hostname: hostname name
- MySQL Port: 3306
- MySQL X Protocol Port: 33060
- Click Next to advance to Backup Information screen.
- Enter the following information:
- Enable Automatic Backups: checked
- Backup retention period: 7
- Default Backup Window: checked
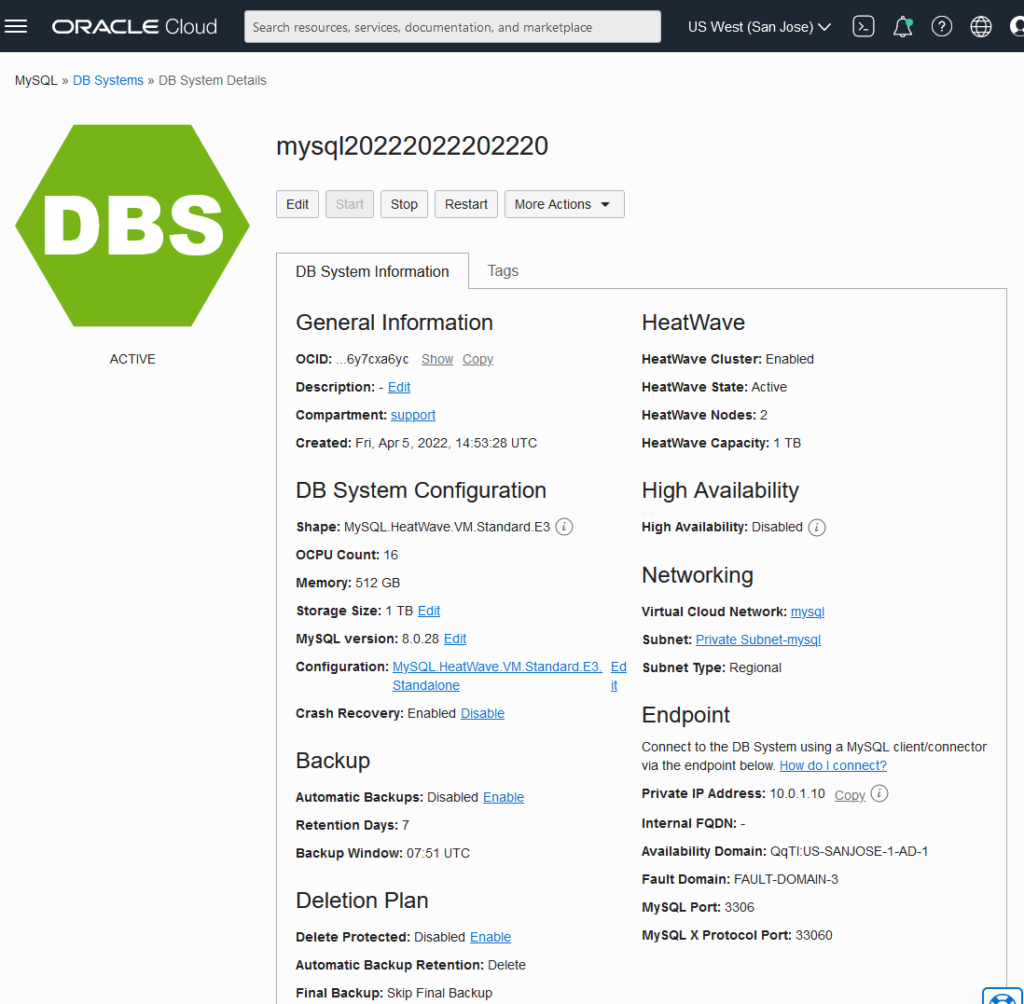
- You’ll be taken to the MySQL DB System’s details page. Once the yellow hexagon turns green, your DB system is provisioned, and up and running.
Following screenshot shows a sample DB System Details settings:
Create VM Compute Instance
Create Oracle Linux instance to host your SSH tunnel.
- Open the Oracle Cloud Infrastructure main menu.
- Select Compute then Instances.
- From the list of instances screen click Create Instance.
- Enter a name for the instance.
- Select the compartment to create the instance in.
- Complete the following in the Configure placement and hardware section:
- Availability domain: Select the Availability domain that you want to create the instance in
- Fault Domain: Optional. Can be left unchecked
- Image: Latest Oracle Linux ( by default the latest supported version will be already selected)
- Shape: Select the desired shape
- Complete the following in the Configure networking section:
- Network Select an existing virtual cloud network
- Virtual cloud network in: Choose the compartment that has the desired VCN
- Network: Select the Virtual Network Cloud Network
- Subnet in: Choose the compartment that has the desired VCN
- Subnet: Select a public subnet *
- Use network security groups to control traffic:unchecked
- Public IP Address: Assign a public IPv4 address
- In the Add SSH keys section:
If you don’t have an SSH key pair:- Select Generate SSH key pair.
- Click on Save Private Key and follow the browser prompt to save the private key.
- Click on Save Public Key and follow the browser prompt to save the public key.
- If you have a public key, you can:
- Select Choose public key files
- Drag and drop the public key files over or browse to a location., find the location and select the files.
- Select Paste public keys.
- Paste the Public Key Value into SSH keys (multiple keys can be added by clicking on Another key).
- In the Configure boot volume, leave all options unchecked.
- Click Create.
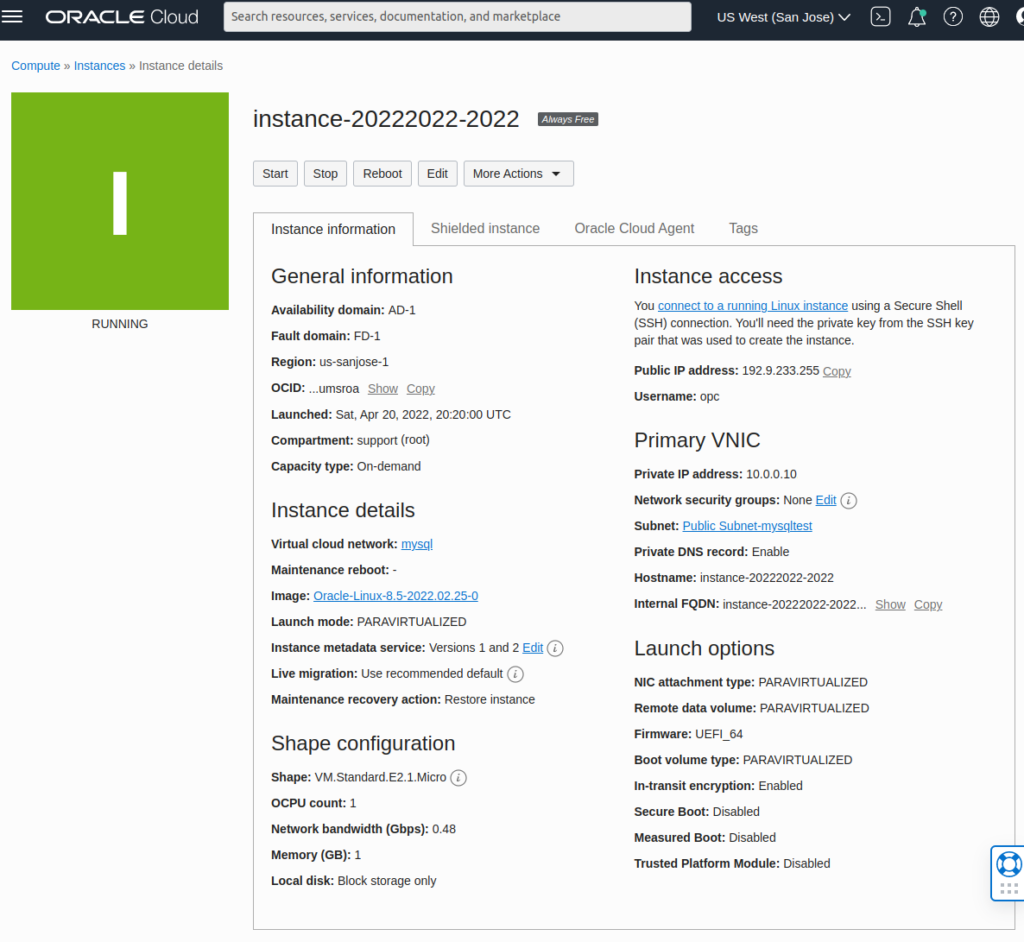
You will be taken to the instance’s details page. Once the yellow square turns green, your instance will be provisioned, up and running.
Following screenshot shows a sample Instance Details settings:
Then move to the machine where ERES server is running. Install ssh client. If you’re running Windows, you can try the “OpenSSH for Windows 8.1” software.
Launch command line interface and enter the following command (with the actual values instead of the description of course):
ssh user@linuxip -i keyfile.key -N -L localport:databaselocalIP:databaseport
Breakdown of the command:
User: The Linux machine user you saved earlier.
- Linuxip: the public IP address of the Linux instance
- Keyfile.key: path to the ssh key file you obtained during the Linux instance creation process
- Localport: choose a local port on your machine. Any port that is free (not being used by any other application)
- databaselocalIP: heatwave database IP on the private subnet (the one that is shared between the Linux instance and the database)
- Databaseport: mysql database port (3306 by default)
For example:
ssh [email protected] -i heatwavessh.key -N -L 3333:10.0.1.10:3306
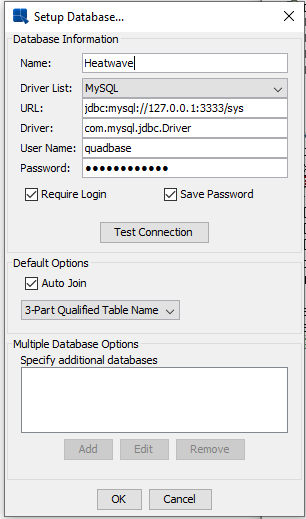
Now start ERES and launch the ERES Organizer.
Connect to the Heatwave database as if you were connecting to a localhost on the port you specified in the command above (the “localport” argument, 3333 in our example).
Please note that in this dialog, you have to use the database username and password, not the Linux ones you used above.
Conclusion
MySQL HeatWave provides a single database for OLTP, OLAP, and machine learning applications, with compelling performance and cost advantages. Organizations using MySQL Database for managing their enterprise data can now run analytic queries with Heatwave with significantly better performance, lower cost, without ETL. Heatwave ML provides a native, in-database machine learning capability that allows users to build, train, predict, and explain machine learning models inside MySQL, without machine learning expertise. MySQL Autopilot provides machine learning automation that improves the performance, scalability, and ease of use of Heatwave. The service can be deployed in a cloud only or in a hybrid environment, and it simplifies management for transactional, analytic, and machine learning applications.